1. User EXEC mode (Also Known as USER MODE)
2. Privileged EXEC mode( Also Known as ENABLE MODE)
User EXEC Mode:
It is represented by greater than “>” and has limited access and used to see the statistics only.user cannot change the configuration in this mode.This is first mode when you log in to the router.
Routername>
Privileged EXEC mode:
It is represented by greater than “#” and you can change the configuration in this mode.
Routername#
How to enter or Exit from the privileged mode:
Routername>enable
Routername#
OR
Routername#disable
Routername>
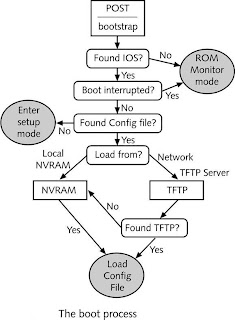
Cisco Router or Switch or Device Startup Process
Cisco Device goes to the following steps during the start up process
1. POST
2. Find and Load the IOS Software Image
3. Find and Applies the Device Configurations

Important Information During Boot Process:
During First Phase as shown in the figure below
1. Processor i-e. Series
2. Main Memory Size
3. IOS version Information

During Second Phase as shown in the figure below
1. Information about the Interfaces
2. Interfaces count
3. Lines

The Way to Configure the IOS Device i-e Router,Switch,PIX Firewall etc
Cisco’s routers and switches support two types of external connections
* Ports(Also known as lines)
* Interfaces.
Physical ports are used for management purposes and they do not effect the router traffic passing through the router.Every Cisco router and switch has a console (con) port; some have an auxiliary (aux) port.
Interfaces are used to connect networking devices together or for passing the network traffic, such as a switch and router or a switch and a PC. Interfaces are connected to the back plane of the switch or router.
Interfaces can be used for management purposes, but it might affect the performance of your IOS device.
* Console terminal
* Cisco Works
* Remote Terminal (aux port)
* TFTP
* Telnat
* SSH
Console Terminal:
* For Console port Connectivity to the PC you need a roll over cable
* Configure the emulation software with the following settings
* 9600 baud
* 8 data bits
* no parity
* 2 stop bits (9600 8N2) OR 1 stop bit Dependant on the router.
[hr]
Importance of the levels of privilege in the Cisco IOS
Cisco IOS offers 16 privilege levels ( 0-15) for access to different commands or to make your router more secure.
The higher your privilege level mean the more router access you have and vice versa.
But most users or network administrators are familiar with only two privilege levels:
* User EXEC mode—privilege level 1
* Privileged EXEC mode—privilege level 15
or
* privilege level 0 — Includes the disable, enable, exit, help, and logout commands.
* privilege level 1 — Normal level on Telnet; includes all user-level commands at the router> prompt.
* privilege level 15 — Includes all enable-level commands at the router# prompt.
By default you are in user EXEC mode (level 1) When you log in to a Cisco router.In this mode, you have access to limited information about the router, such as the status of interfaces, and you can view routes in the routing table. However, you can’t make any changes or view the running configuration file.
By typing enable command takes you to level 15, privileged EXEC mode. In the Cisco IOS, In other words, you have full access to the router.
In bigger organization to properly manage and secure the router , Cisco gives the idea of levels
Configure the Levels
* Show privilege: This command displays the current privilege. Here’s an example:
router# show privilege
Current privilege level is 3
* Enable: this command used to go to privileged EXEC mode. However, it can also take you to any privileged mode. Here’s an example:
router# show privilege
Current privilege level is 3
router# enable 1
router> show privilege
Current privilege level is 1
router>
* User: While this command configures users, it can also tell the IOS which privilege level the user will have when logging in. Here’s an example:
router(config)# username test password test privilege 3
* Privilege: This command configures certain commands to be available only at certain levels. Here’s an example:
router(config)# enable secret level 5 level5pass
* Enable secret: By default, this command creates the password to get to privilege mode 15. However, you can also use it to create passwords to get into other privilege modes that you create.
No comments:
Post a Comment